How to set up a drip campaign
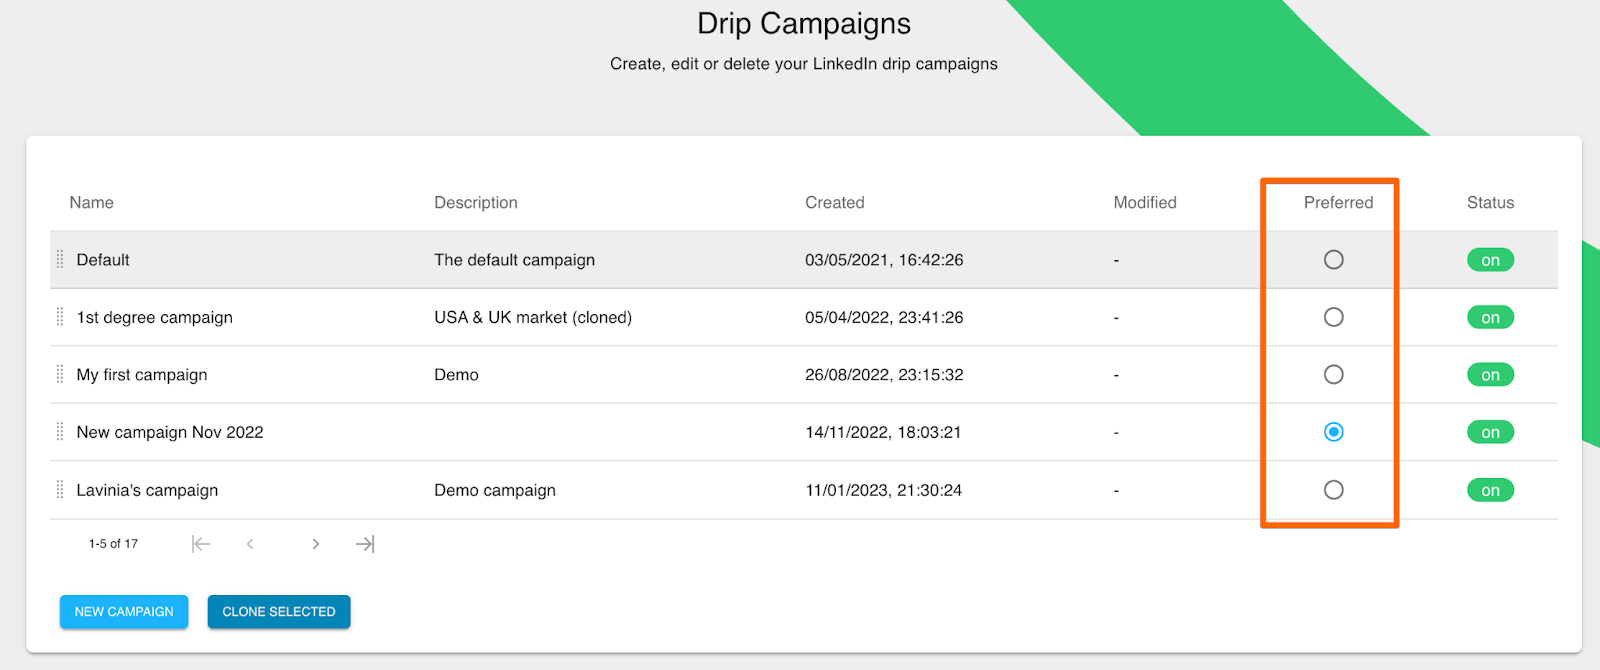
You can access the Dux-Soup Turbo or Cloud campaign setup page via the Dux-Dash, Drip Campaigns page.
Here you will be able to create new campaigns that can operate simultaneously and modify the ones that already exist.
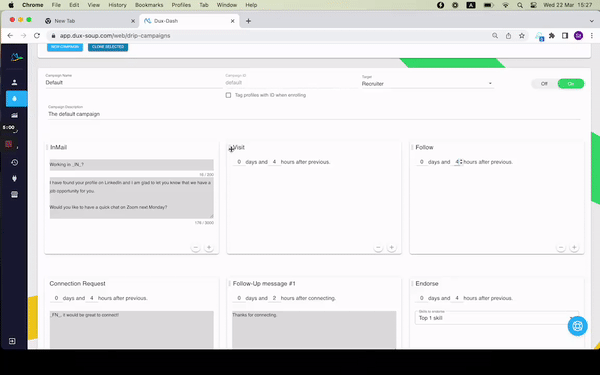
The Default campaign is the pre-set campaign you can modify but you cannot delete it.
When setting up the campaign, you can:
- specify the campaign’s name
- identify the target LinkedIn account
- set Dux-Soup to reject connected profiles when enrolling in a target campaign
- set Dux-Soup to reject all profiles from other campaigns (skip previously enrolled profiles)
- set Dux-Soup to tag all enrolled profiles with the campaign ID tag
- write the campaign’s description.
- disable or enable the campaign.

By default, the campaign starts from the connection request; however, you can rearrange the sequence.
There are 6 actions you can add to your campaign, as well as 4 different types of campaigns Dux-Soup can run.
LinkedIn action options
You can add the campaign action by clicking on a + button: visit, connection request, follow-up (direct message), endorse, follow, and InMail.

To re-arrange the sequence, you can drag and drop.
Types of campaigns you can set with Dux-Soup
Preconnect Campaign:
Only contains 'unconnected' actions and supports 2nd+ degree profiles, including:
- Visit
- InMail
- Follow
- Like a post
Postconnect Campaign:
Only contains 'connected' actions and supports 1st-degree profiles, including:
- Visit
- Message
- Endorse a skill
- Like a post
Connect Campaign:
The Connect campaign can include all available actions and supports all profiles.
The following restrictions apply when setting up the drip sequence:
- InMails can only be set before the connection request.
- Follow-ups and Endorsements are restricted from being scheduled before connection requests.
Visit Campaign:
Only contains visit actions and supports all profiles.
Learn more about the different types of drip campaigns you can run with Dux-Soup here.
After you have set up your campaign or modified it, you need to save it:

Once you have saved your campaign, you can start adding prospects to your drip campaign using the Enroll function.
To create a new campaign, click the “New campaign” button.
To copy an existing campaign, click the “Clone selected” button.

The preferred campaign blue dot selection button identifies which campaign is selected to display in Dux-Soup Tricks when enrolling individually.
Important information:
- All campaign actions will have an automated visit first.
- If your target LinkedIn account is Recruiter, connection requests will be sent in Regular LinkedIn.
- Follow-up messages and endorse actions are restricted from drag and drop before connection requests.
- If you update the drip campaign sequence, it is updated for all actions apart from those already in the queue.
- Follow-ups stop once your prospect messages you. These messages will still show up in the queue (https://app.dux-soup.com/web/command-queue), but will not be sent as all the profiles that respond are blacklisted.
- Dux-Soup cannot detect the response if you archive LinkedIn messages, so it won’t stop the drip campaign once responded in this case.